Easy Blogs Software Tutorial Learn How To Set Up And Configure Easy Blogs
Easy Blogs Software Quick Links
 Easy Blogs Software blog and website builder generates all the pages, navigation, categories, archives and a .xml file in a full blown blog. Here's how it works. There are 4 main areas of the software, the Blog Entry Editor, Template Package Editor, Options and Publish. This tutorial covers each one in depth.
Blog Entry Editor is where you add content e.g. blog posts and articles also category and archive pages are created in this editor.
Template Package Editor is where you design and layout your blog or website template. Use any template you like or choose one from the many supplied templates.
Options is where you set overall settings. Set up basic, advanced, Custom Variables, Template Selection, RSS and Publishing Options like template, blog name, number of entries, how often archiving happens here.
Publish is where you select to publish to a file copy or straight to your FTP host. Enter FTP name, user info and password here. If you select "save to file copy" files are saved in the directory c://EasyBlogs/blogname/. The files can then be uploaded to your host.
Don't Have Easy Blogs Software yet? Get it here...
EasyBlogs Software And Tutorial
 Step by step instructions to create up to 100 blog/websites. Includes 326 page ebook.
AKA SBI RSS Tutorial
Only
Customer Service - No matter what time of day I'm here for you. Unlike other design firms I work all the time, days, nights, weekends and holidays. I'm just a phone call or email away. Get free advice for 30 days forever. Learn more...
Easy Blogs Software Main Screen
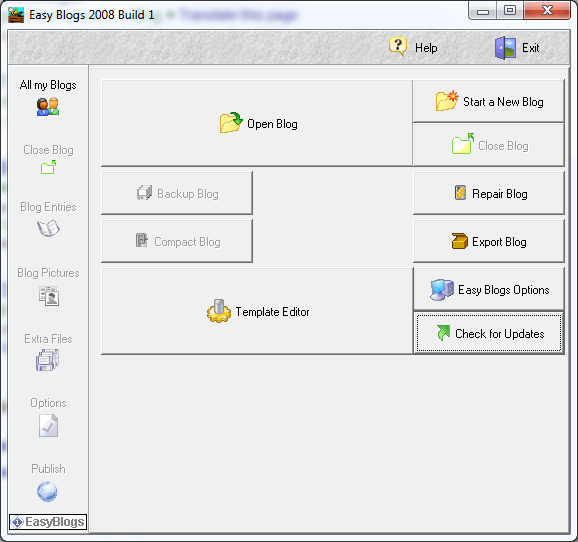
The first screen you see after installing the software is where you start a new blog or perform maintanence to existing blogs. This page is accessed by the "All My Blogs" button. The large buttons "Open Blog" and "Template Editor" are self explanitory. These are the most used buttons.
You are asked a series of 5 questions about pages to be included in your initial setup. They are:
- Would you like to see "Recent Entries" on your home page? If you answer 'yes' blog entries are included one your "index" or home page. Answer 'no' to have a separate page for blog entries and home page.
- Would you like to insert an 'About' page for your blog? If you answer 'Yes' a page called about.html' is added to the blog page. Recommended to answer yes. If you don't want it later on you can delete it. However every website or blog should have an 'About' page. You will gain trust from your readers who can get to know you a little bit.
- Would you like to insert a "Links" page for your blog? Recommend you answer 'No' to this question. A links page used to be a good idea way back when, but now is considered a search engine manipilation. So, Google may penalize your blog/website because it has one. On the other hand you may desire this page to list collaborators or partners or locations for your business. To simply include links to other sites should be done naturally within appropiate posts or articles.
- Would you like to set basic options for your blog? If you anser Yes you are taken to the 'Basic Options' page. If you answer 'No' you can set your options later. Try to enter as much info as you can now. But, you can update this page at any time.
- Would you like to choose a template for your blog? If you answer 'Yes" you are taen to the 'Template Options' page, where you can select a different template. If you answer 'No' the default template is used. EasyBlogs comes with several pre-formated template you can choose from. One superior aspect of Easy Blogs software is that you can create any custom template you like. That concludes the "Basic" setup. When completed you get the "Blog Entries List."
EasyBlogs Blog Entry List
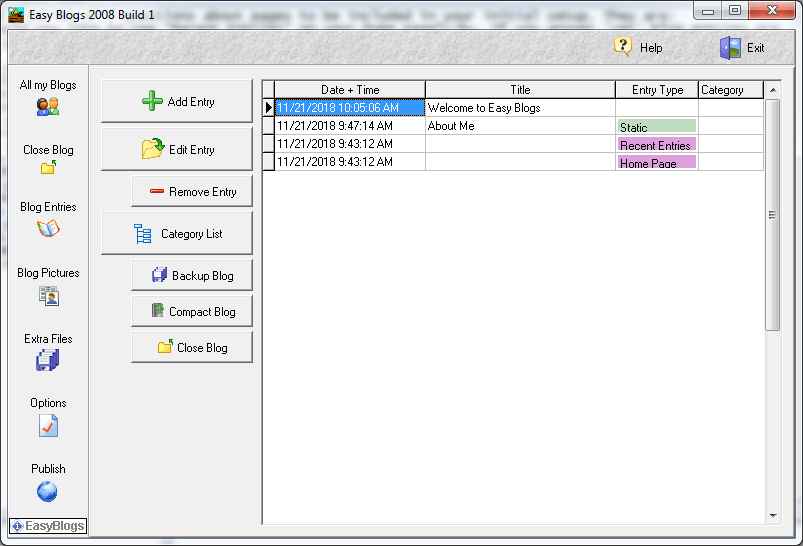
This is where you add, delete or edit your entries. You can also edit your category pages from this page as well. Other options include backup blog, compact blog, close blog and remove entries. We will get to this later. For now let's continue the setup procedure. Go to the "Options" tab to continue setting up your blog.
Date + Time information can be used to locate entries. For instance if an entry may be made in the month 11 of the year you can see it in the archive page for November of that year. Archive pages are named for the date they are generated. Like this November of 2018 is named 201811.html.
Title is the title you entered in the Blog entry Editor for that post. We recommend that you use your primary keyword or phrase as the very first words in your entry. This would also be your filename. This makes it easy tto search for n entry by name.
Entry Type is the type of entry and there are several. They are "Blog Entry, Article, Hidden, Static, Home, Recent Entries and Free Format" page. Entry types can be changed at any time. This helps developers organize their entries.
Category is the category you assigned the entry too when you first made the entry. Up to 3 categories can be selected or none. Keep in mind blog entries are the same as archive and category entries.. This can create duplicate content. Article teasers can be limited to just the title thereby reducing duplicate content. Same for Categories.
Don't Have Easy Blogs Software yet? Get it here...
EasyBlogs Software And Tutorial
 Step by step instructions to create up to 100 blog/websites. Includes 326 page ebook.
AKA SBI RSS Tutorial
Only
Customer Service - No matter what time of day I'm here for you. Unlike other design firms I work all the time, days, nights, weekends and holidays. I'm just a phone call or email away. Get free advice for 30 days forever. Learn more...
back to top of Easy Blogs Software and Tutorial
Template Packager Editor

There are also: Easy Blogs Program Options and Template Editor. The "Template Editor" open the "Template Packager." This is where you setup your template.
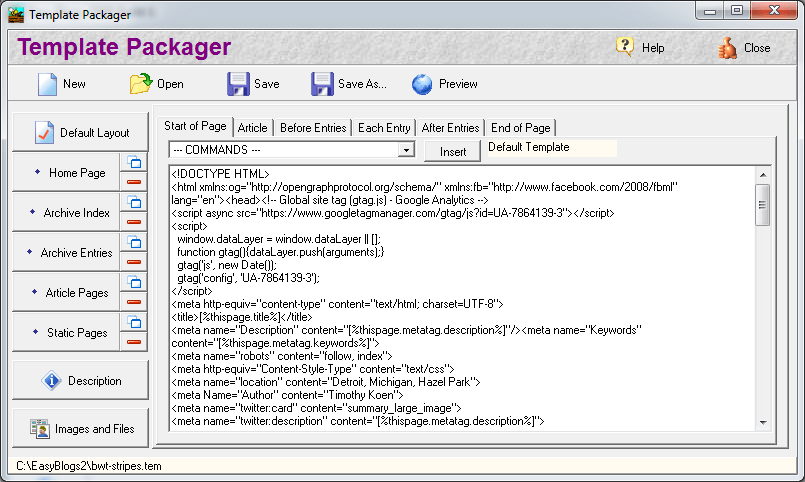
The Template Packager is used to create sharable templates for Easy Blogs. The basic steps to create a template package are:
- Create your HTML pages using your favorite HTML editor. Or start with a supplied template
- Start the template editor. It can be found on the "All my Blogs" page of Easy Blogs. Start a new template by clicking on the NEW button or click on OPEN to work on an existing template. Click on the default layout section by clicking on the default layout button.
- Break your HTML page into slices and place the appropriate slices in each section. There are sections for the start of the page and the end of the page. There are also sections for when the content is a single entry (such as an article page), and sections for the start of a series of entries, for each entry, and for the end of the series where multiple entries would occur (such as all blog entries for an entire month).
- Go through the slices and inset variables and functions as needed. For most templates, you will only need to do the default template. For extreme flexibility you can create separate templates for your home page, Section Index pages, Section Entry pages, Article pages, Hidden and Static pages.
- SAVE. It is always a good idea to save the template package frequently and especially before previewing.
- Add your files and images. These files end up in the same directory as the HTML pages when websites are generated from the templates. Or you can create a separate directory for images and support files. Just make sure your links are properly coded to be pointing to the correct directory when building your entries.
- Save again.

30 Day Money Back Guarantee
 No questions asked.
OPEN button opens the template list. Use this to edit existing templates. Select the template you want from the drop down list.
SAVE saves the template package. Use this button often to save your work. If you forget to save before you close the package your edits will not be saved.
SAVEAS allows you to duplicate and rename a template package. Can be useful to create different versions from one master template.
PREVIEW buttons opens a list of options in a browser window to preview. EasyBlogs defaults to your selected default browser. From here select a preview type that matches what you are working on.
Easy Blogs Software Preview Options
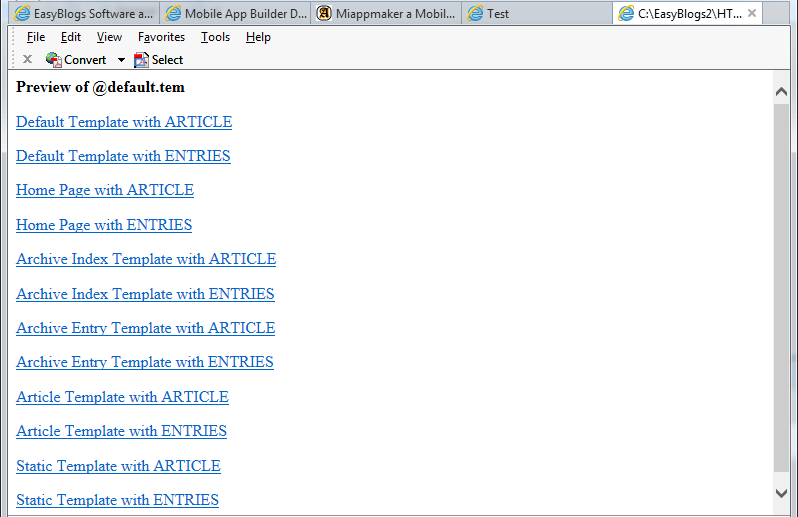
This button generates a preview of the current Template Package and launches your browser program. This allows you to preview each template with examples for both "article" and "multiple entries" layouts.
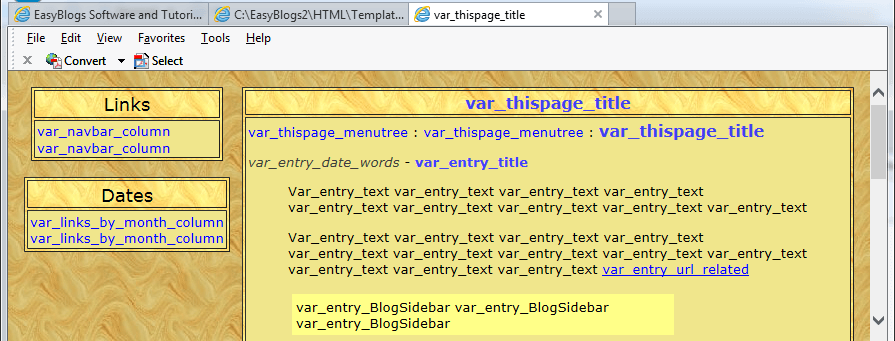
In the image above you can see some of the automation built into the Easy Blogs software. EB generates several menus both horizontal and vertical menus. EB can generate a 'sidbar' area that can be styled separately from the main design.
To update your blog/website do it in the Template Packager. Note: this previewer is different from the "Preview Pages" previewer in the Publish area of Easy Blogs software.
Don't Have Easy Blogs Software yet? Get it here...
EasyBlogs Software And Tutorial
 Step by step instructions to create up to 100 blog/websites. Includes 326 page ebook.
AKA SBI RSS Tutorial
Only
Customer Service - No matter what time of day I'm here for you. Unlike other design firms I work all the time, days, nights, weekends and holidays. I'm just a phone call or email away. Get free advice for 30 days forever. Learn more...
back to top of Easy Blogs Software and Tutorial
Easy Blogs Software Blog Entries Screen

Blog Entries button opens a new tab with several more options. They are "Add Entry, Edit Entry, Remove Entry and Category List."
Add Entry creates a new empty blog post for editing. An archive number is assigned which is an index location. This index location is accessed by the Easy Blogs software to link to the post.
Edit Entry is used to edit or modify existing blog post. To edit a post highlight it by click in the "Blog Entry List" (shown above) The existing post ill be opened in the "Blog Entry Editor."
Remove Entry buttons deletes the selected entry. Once the remove entry is clicked the post is gone forever, there is no undoing a deleted entry. However you should occasionally backup your blog. Thereby having the ability to retrieve old accidentally deleted posts.
Category List is where you create the "Category" pages. It opens "Category List" Editor.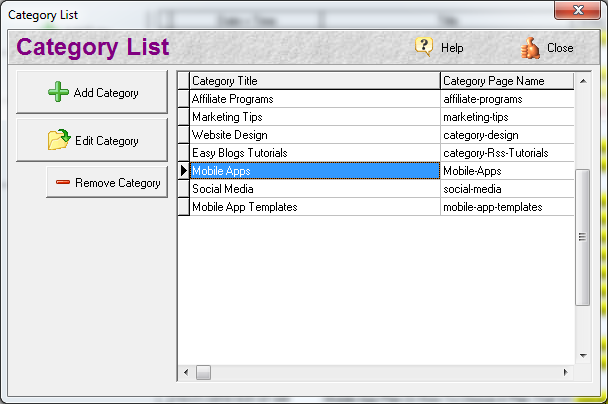
There are 3 options in the Category List editor. They are :Add Category, Edit Category and Remove Category. Add and Edit Category buttons open the "Category Entry" editor where you input content describing each category. There is included a "Category Teaser" section which populates the "Category Index" page.
back to top of Easy Blogs Software and Tutorial
Easy Blogs Software Options
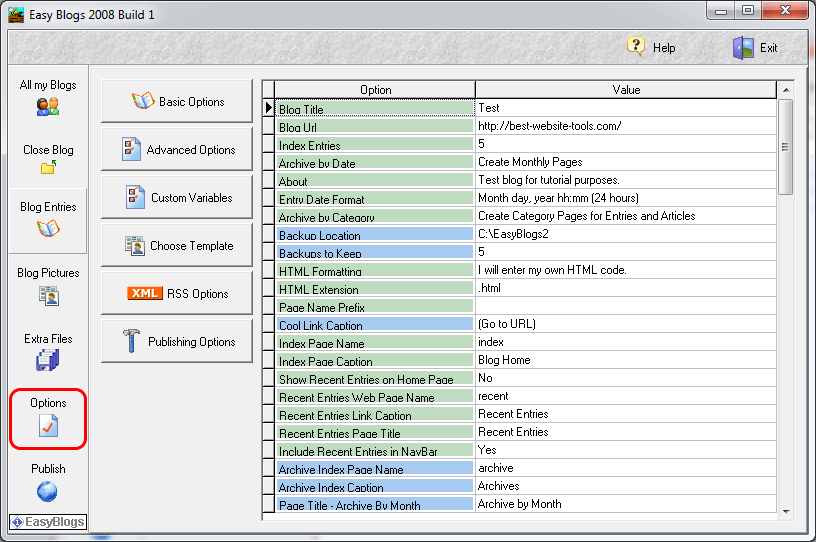
Go through the option settings from top to bottom. Starting with the "Basic Options" button.
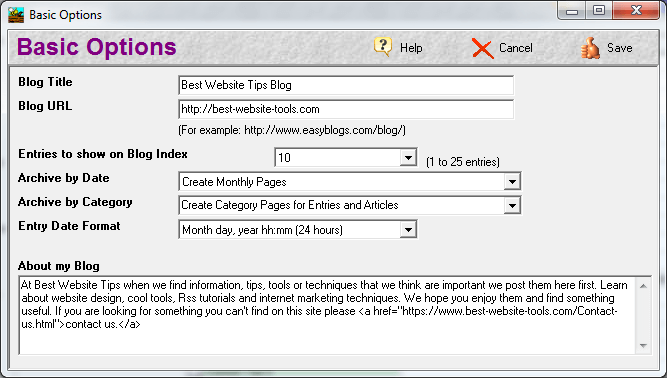
Blog Title is the main title or name of your blog. This is the what your blog is called when it gets syndicated using rss.
Blog URL Enter the web site address where the blog will be found. Enter the "http://" and the address up to the point where any page name would start. This is not the URL of the main blog page. Examlpe: https://www.best-website-tools.com. One error you may encounter when generating pages is "blog will not validate." If you see this it may be because the 'blog URL' is incorrect.
Satisfaction Guaranteed
 Create A Blog Empire
Length of page is important for search engine optimization. Longer pages usually get ranked higher than shorter pages. The theory is more words = more importance. It is better to write long entries and have fewer of them than to have lots of short entries. A blog entry should be at minimum 25 words and not more than 450 words. The idea of a blog or article teaser is to entice your visitors to click through to a more substantial article. At 450 words in length the entry is long enough to be an article page by itself. Article pages should be a minimum of 400 words with no upper limit. Even 20,000 word pages are okay.
Archive by Date has 3 options. monthly weekly and daily. Select from the drop down menu which option you like. The Easy Blogs software will generate archive pages based on this entry. For monthly a new page is generated once a month. For weekly pages are generated once a week on Sunday. For daily pages an archive page os generated everyday.
Upon the archival date a page is created (ex:. 201811.html) for Nov. 2018) and the URL is added to the archive page (ex: archives.html). Keep in mind that if you skip posting those archive pages are not generated. you can however change the creation date to move it in the archive.
Warning changing the 'Archive by Date' option can generate discarded pages. For instance if you switch from monthly to weekly all the monthly pages are generated and then discarded in lieu of the weekly pages. Conversely if you switch from weekly to monthly the weekly pages become discarded. This can result in broken links on your website.
Archive by Category has 4 options. They are:
- Create Category pages for Entries and Articles
- Create Category pages for Articles only
- Create Category pages for Entries only
- Ignore all categories

Entry Date Format has several options. This option determines how the pages are named. Every new Article, Static, Hidden and Free Format page is initially named. However you can change the name of these pages in the "Page Name;" field in the Easy Blog software. All Archive pages are generated with the year + month + day format.
Do not change this option once selected as that can result in discarded pages. Which in turn could generate broken links on you website. We recommend changing the 'Page Name' immediately before saving the first time.
Don't Have Easy Blogs Software yet? Get it here...
EasyBlogs Software And Tutorial
 Step by step instructions to create up to 100 blog/websites. Includes 326 page ebook.
AKA SBI RSS Tutorial
Only
Customer Service - No matter what time of day I'm here for you. Unlike other design firms I work all the time, days, nights, weekends and holidays. I'm just a phone call or email away. Get free advice for 30 days forever. Learn more...
back to top of Easy Blogs Software and Tutorial
Easy Blogs Software Advanced Options Screen 1
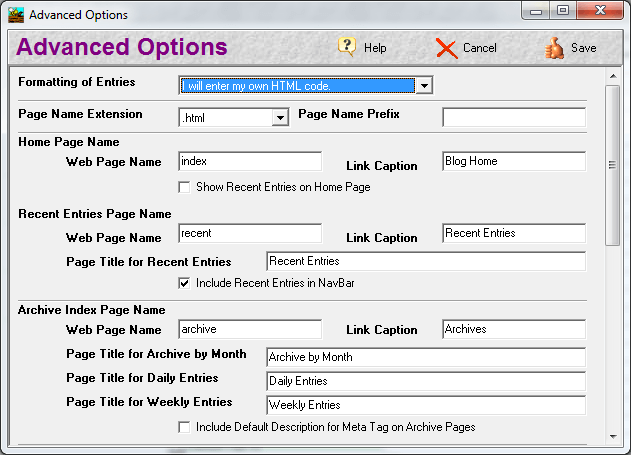
This is where you name the tier 1 and tier 2 pages. Tier 1 page is typically the home page. Tier pages are linked to from the tier (home) page. Tier 3 and tier 4 pages are linked to from the tier pages.
Formating of Entries this setting has 2 options "I will enter my own HTML code" and "EasyBlogs will try to format each entry." We recommend setting this to "I will enter my own HTML code." In this case you write all the HTML code for the entries. If you let EasyBlogs try to format the code EB will attempt to interpret what you want. For instance a double line break results in a new paragraph. And adding HTML code shows in a literal interpretation. In other words the code is shown as text.
Easy Blogs software does have buttons in the "Blog Entry' editor for including formating such as Bold, Italic, Underline, Font, Ordered and Unordered lists, Link, Image, Centering,Table, Line Break and Paragraph. You get an HTML editor with icon buttons to style your content.
Page Name Extension has 2 options. "html" and "htm." The extensions are appended to the end of the file names for pages. Set this to "html" as the most widely accepted and used format. Htm extension may not be recognized by other third party applications.
Home Page Name is typically named "index." We recommend naming this "index" as this is widely recognized and the first page on any website. Especially if you want to create a complete website with EB. However if you want your blog to stand alone or added to an existing website name this something appropriate to your blog, such as 'news, or 'blog.'
Link Caption is the anchor that goes into the navigation menus. For instance "Blog Home" will point to the "index" page but the Menu will say "Blog Home."
Show Recent Entries on Home Page option determines if the blog is stand alone or part of a larger website. Check this box if you want the blog to stand alone or added to an existing website. Leave this box unchecked if you want to build the entire website in EB.

Recent Entries Page Name will be the file name for the blog page. That is if you want both an index and blog pages.
Link Caption is the anchor text that appears in the navigation menus.
Page Title for Recent Entries is the title that appears at the top of the Page. This is different than the 'Link Cation.' You can get creative here. Be sure to add your primary keyword and some long tail keywords. For Instance the title of this blog is "Best Website Tips Blog Tools Articles News"
Include Recent Entries in NavBar option includes a link to the blog page in the navigation menus. Leave this option unchecked if you have your entries on home page.
Archive Index Page Name is a tier 2 page and has several options to set. They Are:
Web Page Name is the file name of the archive index page. The Archive index page is populated automatically by EB. It contains links to the archive by month, week or daily pages. Which are also automatically generated by EB. The default setting is "archive" which will have the extension .html' appended to it. This is different than the link Caption.
Link Caption is the anchor text that shows up tin the navigation menis. The default is "Archives" whish says it all. Change this if you want however. Changing it back later may result in confusion. Because once a page is name is changed it goes onto the 'remove entry list genterated by EB. Changing a file name to a previously used name may have it removed all together.
Enable Default Description and Meta Tag on Archive Pages. inserts the text you entered in the "Custom Variables" area. (We'll get to that later in this Easy Blogs tutorial.) Since you can enter descriptions elsewhere we recommend leaving this unchecked.
Don't Have Easy Blogs Software yet? Get it here...
EasyBlogs Software And Tutorial
 Step by step instructions to create up to 100 blog/websites. Includes 326 page ebook.
AKA SBI RSS Tutorial
Only
Customer Service - No matter what time of day I'm here for you. Unlike other design firms I work all the time, days, nights, weekends and holidays. I'm just a phone call or email away. Get free advice for 30 days forever. Learn more...
back to top of Easy Blogs Software and Tutorial
Easy Blogs Software Advanced Options Screen 2
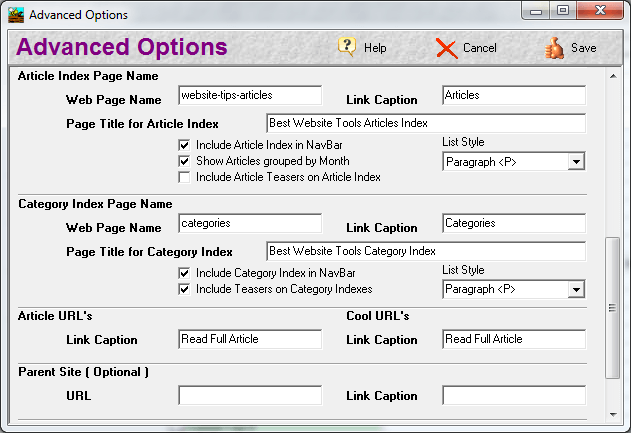
Article Index Page Name is also a tier 2 page and is added to the navigation menus (optional). It has several settings to make, they are:
Web Page Name is the file name of the Article Index page. the default is articles. This page is automatically populated by the Easy Blogs software.
Link Caption is the anchor text that goes in the navigation menus
Page Title for Article Index is the Title that goes at the top of the page. Be sure to use your primary and long tail kewords for your title.

Include Article Index in NavBar will add the anchor text as a link in the navigation menus. As this is a tier 2 page we rrecommend checking this option. All article pages are tier 3 pages and listed on this article page.
Show Articles grouped by Month inserts the month the article was first published aon the Article Index page. We recommend selecting this option for organizational purposes. It allows users (and webmasters) to quickly locate an article based on date of creation. And it's a nice feature of the Easy Blogs software.
Include Article Teasers on Article Index is a teaser that goes into the blog page, the archive page and this page. We recommend leaving this option unchecked. EB generates a link to the article using the Title of the page. The teaser is additional information.
If you leave this option checked the linked title and the article teaser are included in the Article Index page. That can eventually lead to a huge page full of duplicate content with no real focus. Just a list of articles is needed.
List Style includes several options that determine how your articles are arranged. Select between a line break, a paragrapg or an unordered (bullet points) or ordered (numbered) list. We reocmmend using the paragraph because it is the cleanest way to present your information.
Category Index Page has the same options as the Article Index page. For the Category Index we recommend checking the "Include Category Teasers on Category Index." Try to include a brief description of the category that you create in the "Blog Entries" area of EB.
Article URL's are links that get added automatically to article teasers. After each article teaser EB adds a link to the archived entry. This is the link that is added after the teaser.
Cool URL's is a link that is automatically added after blog posts. It leads to the archive location in the corresponding archive page. Try to make this link different that the Article URL.

Parent Site (optional) URL should be the website's full URL (ex:https://www.best-website-tools.com) This can be added to the navigation menus or used in various program applications. We don't use it here because the navigation menus automatically include a home page URL and this one is secondary.
Link Caption is the anchor text used in navigation menus for the home page of your website. This can be used if your Home page is not the same as your blog page.
Date and Time fields are populated when you click "Add Entry" on the Main Blog Entry" page. These dates and times can be changed. Thereby giving you control over the date of actual publishing. Change the date and time carefully. It re-orders the blog archive, Article and Category Index pages as well.
Include a Link to this URL is actually a link out of this page and can be used to link to anywhere. We recommend you do not use this feature. Instead try to link out of your page naturally in the "Entry" field. This link always opens a new window or tab separate from your blog/website.

Entry Type is where you define what type of page you are creating. There are several types to choose from. The default is "Blog Entry." You can also select Article, Static, Hidden, Home, Recent Entries, Redirect and Free Format" page types. Most page types are self explanitory so we'll only cover the exceptions.
Static Page is a tier 2 page of your own not already defined by EB. Example of a static page is the "About and Link" pages. If you want a tier 2 page in your navigation create a static page. Keep in mind that if you don't have a specific template for a static page it still gets created using the "Default" template in the Easy Blogs software.
Hidden Page is not included in any navigation menus. Nor is it archived or categorized. These pages are ideal for downloads of digital software or after a purchase. Your buyers can be directed to a hidden page after a purchase is made. Another example is membership sites where users need to login first and can then be directed to a hidden page.
Redirect Page is usefull for redirecting orphan or abandoned pages that still get traffic but may no longer exist. They can also be used to create links used in navigation menus. For instance you may have a third party application you support that you incorporate into your website. You could create a redirect that looks like a part of your website instead of the third party.
Free Format Page is basically a blank HTML page. You have to include every bit of code for the page. Free Format pages are great for thank you pages and special affects or unique one offs. These are also useful for including things like script files that only work on one page instead of being included in every page.
Category pulldown menu allows you to include blog posts and article teasers in the Category of your choice. The are up to 3 category options but we recommend using only 1 category per blog entry. Putting an entry in more than 1 category create duplicate content on your website. There may be excetions when you want an entry to be in 2 or 3 categories but that would be pretty rare.
Page Name field is where you create the file name for your page. The default is a date and time number generated by EB. Change this immediately to the name of your choice. DO NOT add any extension (ex: .html) to this file name, Changing it later will create a discarded page. Note every discarded page slows down the regeneration process.
Don't Have Easy Blogs Software yet? Get it here...
EasyBlogs Software And Tutorial
 Step by step instructions to create up to 100 blog/websites. Includes 326 page ebook.
AKA SBI RSS Tutorial
Only
Customer Service - No matter what time of day I'm here for you. Unlike other design firms I work all the time, days, nights, weekends and holidays. I'm just a phone call or email away. Get free advice for 30 days forever. Learn more...
back to top of Easy Blogs Software and Tutorial
Easy Blogs Software Entry Editor
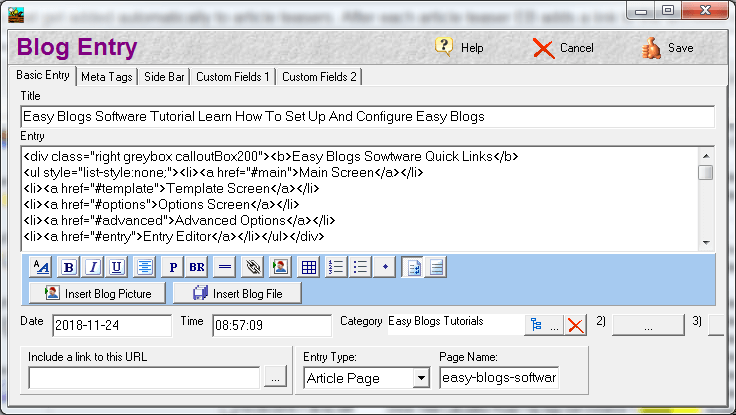
Blog Entry is where you create all the content that goes into the blog/website. Along the top menu bar are tabs for all the sections where you can add content. They are "Basic Entry, Meta Tags, Side Bar, Custom Fields 1 and Custom Fields 2."
Basic Entry is where the main article, page and blog post is written. For blog posts you do not use the "Meta Tags" section because it doesn't exist. But, for articles and all other page types you use the "Meta Tags" section. Notice the formating buttons on the lower menu bar. These can be used to style your content. Below that are fields you use to define the page.
Title is the article page Title or the blog post title. Be sure to use your primary keyword and long tail keywords to describe the page or post.
Entry field is where you write the main content for your article, page or blog post. Use the styling buttons below to modify or add content like images. support files, links, tables, or lists. Usage of these buttons is beyond the scope of this tutorial.

Meta Tags section is where you add keyword and meta description information and Article Teasers. Make sure you fill these in as they are incorporated in the html and xml files. The Article Teasers will be added to the Blog and Archive and Category pages if you selected all those options.
Side Bar
Custom Fields 1 & 2 There are a number of custom variables available at both the entry level and at the global level to allow the advanced user to customize templates beyond the basic blog. These fields are not normally included in the standard Easy Blogs templates but exist for advanced users who are creating their own templates.
Don't Have Easy Blogs Software yet? Get it here...
EasyBlogs Software And Tutorial
 Step by step instructions to create up to 100 blog/websites. Includes 326 page ebook.
AKA SBI RSS Tutorial
Only
Customer Service - No matter what time of day I'm here for you. Unlike other design firms I work all the time, days, nights, weekends and holidays. I'm just a phone call or email away. Get free advice for 30 days forever. Learn more...
back to top of Easy Blogs Software and Tutorial
Easy Blogs Software Publish Options
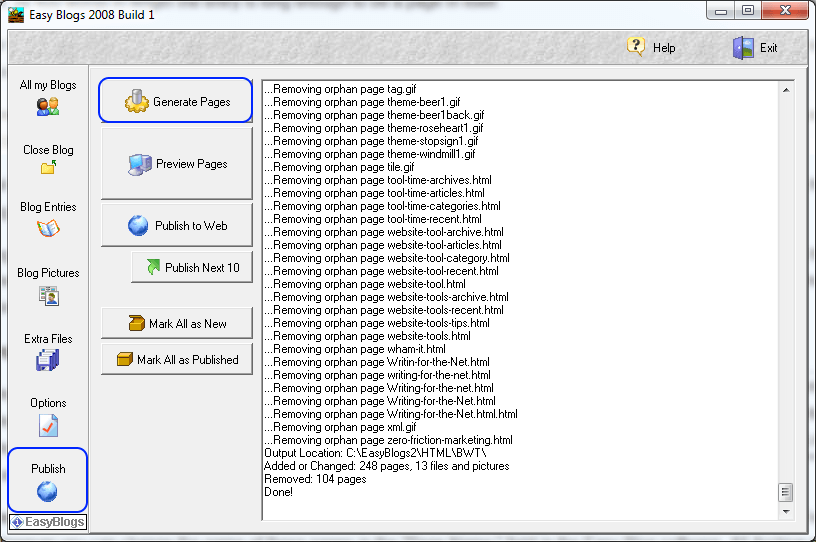
Publish is where you generate and preview pages. Other options include "Publish to Web, Publish next 10, Mark All as New and Mark All as Published." Publishing to Web is beyond the scope of this tutorial but instructions are included in the Easy Blogs Software and Tutorial.
Generate Pages button generates all the pages in one operation. When this button is clicked EB compiles the entire blog/website and returns a list of the operations it has performed. This is the first step in the 'preview' operation. If there are any errors an error message is returned in the color red.
Preview Pages button opens the blog/website in a browser window. EB always opens the browser to the 'Home' (index) page. EB can be configured to work offline. Try to include at least one EB generated NavBars in your template. You can use the NavBar to move around your blog to visit every page. With the exception of 'Hidden' pages which are not included in the navigation. For previewing Hidden pages type in the URL in the browser window.
This preview option is different than the 'Template Preview' option (see Template Package Editor). While both previewers open a browser window this one contains your content while the 'template" previewer only contains the layout elements.
That concludes this mini-tutorial for Easy Blogs software. For detailed step by step instructions you need to purchase..,
EasyBlogs Software And Tutorial
 Step by step instructions to create up to 100 blog/websites. Includes 326 page ebook.
AKA SBI RSS Tutorial
Only
Customer Service - No matter what time of day I'm here for you. Unlike other design firms I work all the time, days, nights, weekends and holidays. I'm just a phone call or email away. Get free advice for 30 days forever. Learn more...
Home : Easy Blogs Tutorials : Easy Blogs Software
61 W. Annabelle Ave. Hazel Park,
MI. 48030-1103, U.S.A.
telephone: (248)546-0374
email: support@best-website-tools.com
© Copyright 2007-2025 All rights Reserved.
Sun: closed
Mon-Fri: 9:00AM to 6:00PM
Sat: 9AM-12:00PM
Closed Holidays
